dear karen, yesterday total finder 1.14.1 worked very well. today after restart of mac, total finder seems to be running (icon ok, processes ok) but finder looks and works as the original one. reinstallation of total finder didn’t help… thanks for advices…
update + solution + bug describing:
i had “completely switch off tabs” checked in preferences.
now i unchecked this option, total finder asked me to restart himself and now my total finder is back!
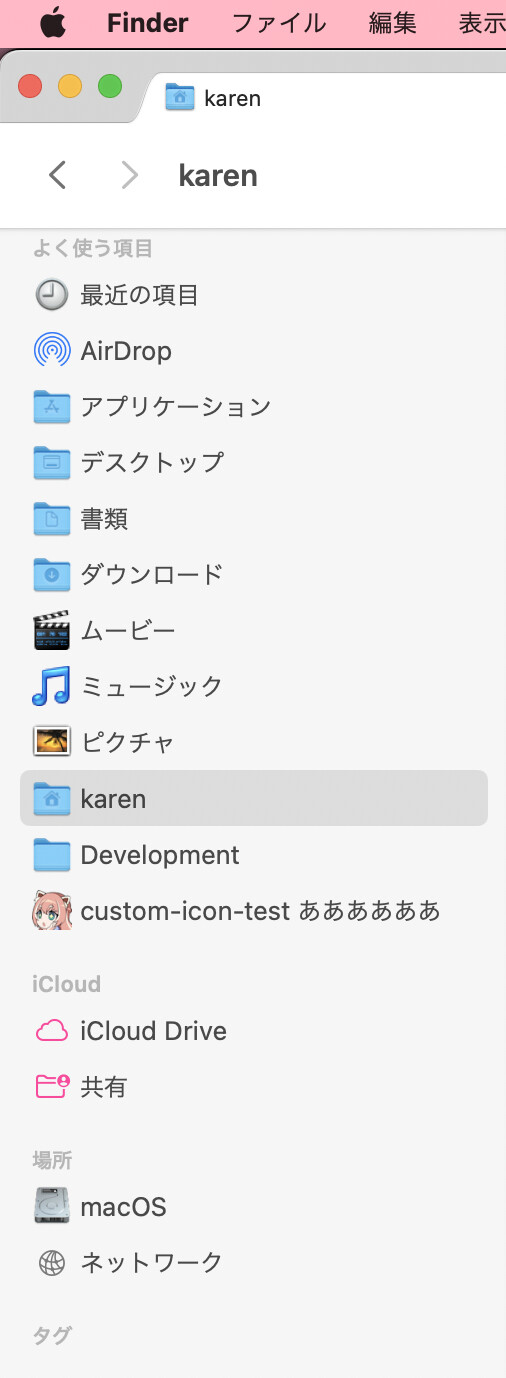
I’ve just fixed the root cause of the issue that was resulting in the “coloured icons” feature being pretty much semi-broken in TotalFinder ever since macOS 10.15 Catalina.
… And as you can see, custom icons work!
That being said though, I’m sure you are noticing that the Applications, Desktop, Documents, Downloads, and Home folders are simply displayed here as plain blue folders.
Basically, they’re displayed the same way they would be if you were to view them in Finder using the “Detailed” view.
Unfortunately, I don’t think I’ll be able to replicate what TotalFinder 1.12.3 was able to do back in macOS 10.14 Mojave, where some of those folders still had their easy-to-read-at-a-glance coloured/skeuomorphic design icons.
That was only ever possible because at the time, Apple just so happened to have left the old icon assets inside macOS.
What do you think? Are you satisfied with this state? Or do you have some input to give?
tl;dr: I got custom folder icons working. Next update, you will get something like the screenshot above on macOS 12, 11, and 10.15. The old coloured icons are no longer available for some of the system folders but you can just set your own.
※ EDIT — Please read
Just did some more testing and found a quirk regarding the current implementation.
If you try to set a custom icon for the Music, Pictures, and Videos folders, the TotalFinder coloured sidebar feature will not display them. Instead, the old skeuomorphic Apple icons are used, as seen above.
Is that desirable behaviour? Or is setting those to your own custom icons what you truly want?
If so, I may add an additional option letting you choose between two behaviours:
“Always render the sidebar icons exactly however Finder would render them if you navigated to the folder in Details view”
“Try to use the old skeuomorphic Apple icons whenever possible — if not, fall back to the above behaviour” (← This is how it currently works)
For reference, this is how it would look with the “always render as Finder would” behaviour:
Thanks for the update and your continued work on this. It’s very much appreciated.
Ideally, I’d like to be able to display in the sidebar whatever folder icon I have set in the Finder, including any of the default folders (Desktop, Library, Music, Photos, etc) inside the home folder.
But if that’s not possible, then I’m okay with the default macOS blue folders or the skeuomorphic ones. Anything is good as long as I don’t have to look at those SF symbol glyphs.
I will make sure that you’ll be able to always see your custom icons for the default folders!
@shh_sg Also another update from the earlier post I made above — I fixed the issue regarding IconChamp custom icons and TotalFinder.
This means that IconChamp custom icons like your beloved hippo will work on the next TotalFinder update!
(That being said, I’ll try to get into contact with the developers of IconChamp and notify them that they should be hooking an additional location to cover more icon use cases ;P)
I had a look at my Mac Mini server running Mojave with XtraFinder installed. Interestingly, some folders are displaying the old macOS skeuomorphic icons for Movies, Pictures, and Music. And for Downloads, it shows the generic blue macOS folder with the embossed download symbol.
So it seems like this issue existed on Mojave and in XtraFinder, as well.
I’ll have to check my other Mojave install on my hackintosh once I boot back into it. I’m currently booted from Windows 10.
I don’t mind the skeuomorphic icons. It’s the lack of consistency that’s most irksome. I guess that is the result of incomplete old icon assets inside macOS, as you pointed out earlier.
I was elated to have TotalFinder back for M1 Monterey.
I already had SIP disabled for another app I was using so no big deal.
However, when going into my M1 recovery and lowering security settings as described in the support tutorial, all hell broke loose…
Upon restarting my computer there were all sorts of problems with software loads asking for additional permissions. In addition, some plug-ins that I was using refused to work.
In the end, the only way I could fix these issues was to reinstall the OS software.
I am really sad that I can’t use TotalFinder under these conditions
@Ronald_Epstein That’s… very strange and certainly should not happen.
I am really sad that I can’t use TotalFinder under these conditions
Don’t worry, I’m here to try to help you get this working! (And possibly improve the documentation, if it was confusing)
I already had SIP disabled for another app I was using so no big deal.
What app was this? Also, did this app instruct you to disable SIP (using csrutil), or did it only require you to lower security settings to “Reduced Security”?
However, when going into my M1 recovery and lowering security settings as described in the support tutorial, all hell broke loose…
If you already had SIP disabled, all you really had to do was Part 3 in the instructions — following Parts 1 and 2 wasn’t really necessary (although it wouldn’t have hurt, anyway).
Can you tell me exactly what changes you made and at what point errors started coming up? If not, please just try again following the instructions exactly to the letter, from Part 1 all the way to Part 3.
(Also, which apps/plugins broke?)
The state that you are describing sounds like to me that you had rebooted back into macOS immediately after completing Part 1 of the instructions, which actually does re-enable SIP temporarily.
SIP is only disabled after following Part 2. It is possible that this is the reason why everything started asking you to re-disable SIP.
Please note that if you had booted back into macOS after Part 1 but without completing Part 2 in the guide, SIP actually is enabled. Basically, here’s a summary of what each step does:
Part 1: Putting your system in “Reduced Security” mode actually re-enables SIP if you had it disabled previously.
Part 2: As a result, we go back into “1TR” (one true recoveryOS, aka the hold-power-button recoveryOS) and run csrutil to disable SIP.
Part 3: This is done inside macOS and basically involves just creating a file in your home directory.
Please let me know if you have any more issues — I am determined to help you get TotalFinder working on your system ;P
Would it be a lot of work add an option for rectangular tabs like this?
If it’s a non-trivial amount of work to implement this, don’t bother. You’re already spending a lot of time fixing TotalFinder for Monterey and M1 Macs.
The reason I already had SIP disabled was that another software app required it. I think the app is SoundSource.
I am aware that re-installing Mac OS re-enables SIP so the first thing I did when I reinstalled Monterey was going in and disable SIP again.
So, right now, SIP is disabled and I am NOT on reduced security. You are saying that all I need to do is follow step 3? That looks simple as it’s just a terminal command. Let me try it and I’ll let you know if I get TotalFinder working.
Once again, very much appreciate the level of support here
EDIT: Just re-installed TotalFinder and used the terminal command and then disabled some sort of library check at startup and IT WORKS!
So happy to have TotalFinder back. Thanks so much!
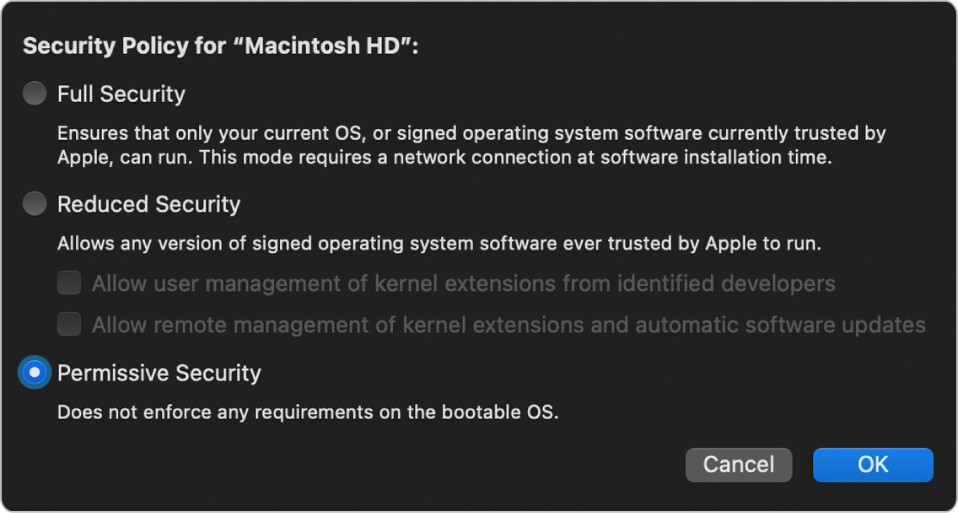
Hey @Ronald_Epstein, I have SoundSource too, and I was initially confused when I went into recoveryOS and was already on Permissive Security. So I ended up raising the level, to the recommended Reduced Security setting.
Well, it was either SoundSource, the RME drivers, or Paragon NTFS that had previously sent me there.
Anyway, it turns out that the Reduced Security setting that @akemin_dayo has specified is enough for all these kernel extensions, so that’s great.
I too am incredibly happy to have TotalFinder back on my M1 Pro. And Karen, your detailed support in this thread has been wonderful. Thanks.
The great thing is that I only had to turn off SIP.
The problem I had was when I turned on reduced security, I had problems with so many apps either asking for extra permissions at launch or plug-ins (like MailButler) not working at all.
@strafer This would unfortunately involve reworking quite a bit of the tabs rendering code in order to get it working and making it look good / coherent.
I’ll note this down as a feature request, but it’s unlikely this will come anytime soon — sorry about that.
The current version of the documentation doesn’t really address users that already have SIP disabled, which was a massive oversight on my part. I’ll push an update to it to better help future users.
(On a side note, I also use SoundSource/Audio Hijack/…Rogue Amoeba ACE apps in general, as well as Paragon NTFS ;P)
@Peter_Hollo I’m glad that TotalFinder is working for you! However, I do want to clarify that you are actually not in “Reduced Security” mode.
You are still in “Permissive Security” (SIP disabled or weakened) mode.
What the steps you followed did, was that it had you temporarily raise it to “Reduced Security”, before lowering it back down to “Permissive Security” (SIP disabled or weakened).
A detailed explanation of why I had you do this seemingly-pointless procedure can be found below, if you would like to read it.
@Ronald_Epstein While the configuration that you are describing (“I went straight to disabling SIP without first changing my system to Reduced Security before doing so”) is valid, please be aware that there is a reason why my instructions tell you to go to Reduced Security first.
A detailed explanation of why I had you do this seemingly-pointless procedure can be found below, if you would like to read it.
In which I attempt to write a simplified-yet-informative explanation of the Apple Silicon security model
The core issue that I’m dealing with here lies with the very confusing way that Apple has chosen to design their user-facing tools for modifying Apple Silicon security features.
So, the TotalFinder documentation instructs users to perform two major steps concerning SIP:
Set your system to Reduced Security mode, and allow user installation of kernel extensions (kexts).
Reboot back into “1TR” (hold power button) recoveryOS, and then use csrutil to disable or weaken SIP, which results in your system being put into what Apple calls “Permissive Security” mode.
You may have noticed something strange about this already.
… Why exactly is it that I am instructing users to lower their security twice?
Why do we have to make a stop at “Reduced Security” through the System Startup Utility before we can run csrutil to disable SIP and reach “Permissive Security”?
Why don’t we just skip Step 1 entirely? (← @Ronald_Epstein, this is what you did, if I’m understanding what you wrote correctly.)
The answer lies with some deeply strange and bizarre design choices from Apple.
Understanding the Apple Silicon BootPolicy LocalPolicy
The security architecture and design of Apple Silicon Macs are very different from how things worked back on Intel (x86_64).
One major difference lies in the existence of something Apple calls the BootPolicy LocalPolicy, which is heavily documented in their Platform Security Guide.
The BootPolicy (which, by the way, is per-OS, hence “LocalPolicy”) contains various flags that tell macOS to enable or disable certain security features.
You can view your current flags using sudo bputil -d in a Terminal session.
As you can see here, the “Security Mode” (FourCCs smb0 and smb1, if you want to follow along in Apple’s documentation) is Permissive, and the SIP status (sip0) is 7f (“fully disabled” — if you’re running a partially-disabled SIP configuration, you will have a different sip0 value, which is fine).
But have you noticed something here?
There is a completely separate entry for “3rd Party Kexts Status” (smb2).
… So what does this mean?
Trying to prevent users from shooting themselves in the foot
In the software engineering community, we’ve coined a word for tools that have a large potential for users to accidentally “shoot themselves in the foot”, so to speak.
We call them “footguns”, and Apple just handed you a pretty big one.
Basically, when you run csrutil to disable or weaken SIP, you are in fact, ONLY changing the Security Mode and the SIP Status.
By disabling SIP without first using the Startup Security Utility, you will end up in a state where you cannot use kernel extensions (kexts), even though you have SIP disabled or weakened.
“But wait,” you ask, “can’t I just enable kexts later if I need them?”
Ah.
So about that.
The “Startup Security Utility”, due to some utterly incomprehensible reason, does not let you enable kexts unless if you are in “Reduced Security” mode. The options are quite literally greyed out.
What happens if I disabled/weakened SIP without first going to Reduced Security mode?
Let’s say you don’t use any kexts right now. You install TotalFinder, and you disable SIP without first going to Reduced Security mode.
Some time passes, and you find yourself wanting to install a kext. Maybe you want to…
Use OpenVPN or SoftEther VPN, both of which require TunTap
Write to an NTFS disk, which requires Paragon NTFS
Update your Sony Alpha mirrorless camera, which requires the “Sony Camera Driver” kext
Charge USB devices at high wattages through your CalDigit Thunderbolt dock which requires the “CalDigit Thunderbolt Station Charging Support” kext
… and more.
So now you want to install kexts. But the software you’re trying to install keeps yelling at you, telling you to enable “Reduced Security” mode and allow kexts.
“Wait, but how does that make any sense!?” you ask, exasperated. “I’m in a mode even less secure than that, I’m in Permissive Security mode!”
After some research, you come across this thread, and realise that you have to:
Boot into 1TR recoveryOS, and temporarily upgrade your security to Reduced Security mode.
Now, you can check the box to allow kernel extensions (kexts)!
… But now you’ve rebooted back into macOS and TotalFinder is broken now, because SIP was re-enabled when you upgraded to Reduced Security mode.
You let out a heavy sigh, boot into 1TR recoveryOS again, and disable/weaken SIP again via csrutil, which downgrades you right back in “Permissive Security” mode, but now with kexts enabled.
This kind of ridiculous, headache-inducing situation is what I want to avoid for users.
This is why I specifically wrote the documentation to instruct users to to first set their systems to Reduced Security, and then further down to SIP disabled/weakened (aka Permissive Security).
This way, I make sure that pretty much every conceivable user is covered under my instructions, no matter if they are already using kexts (but may not necessarily know / remember), or if they are currently not, but may do so in the future.
Basically, by following my documentation, your system will be in the correct state for pretty much any macOS software you’ll run into in the future.
The current version of the documentation and its shortcomings regarding users that already had SIP disabled for other software
So what happened with you guys?
I’ve come to realise that the current version of the documentation doesn’t really do a good job at communicating to users that if they already have SIP disabled, they don’t actually need to follow Part 1 and Part 2 — and instead they can just go directly to Part 3.
That being said, there wasn’t actually any harm in following the instructions anyway, even if you already had SIP enabled.
What probably ended up happening though, was that you may have been led to feel like you’ve accidentally done something wrong.
You see, if you followed the instructions, you actually ended up raising your security level (to Reduced) by following Part 1, before lowering it back down using csrutil in Part 2.
This operation does not affect any of your other apps in any way, since you will end up back in a SIP disabled/weakened state (Permissive Security) anyway.
However, if booted into macOS after Part 1 (instead of directly into 1TR recoveryOS again for Part 2), all of your software that required SIP to be disabled probably started yelling at you, which likely made you feel like things went horribly wrong.
Following through with Part 2 (disabling/weakning SIP again) would have solved all of that, but I understand why you were perhaps apprehensive about doing so.
Either way, I’ll update the documentation sometime soon to better handle the SIP-already-disabled state, so future users won’t be confused!
Hopefully this entire explanation all makes sense to you.
※ I’ll probably end up editing this post several times since I feel like I could be clearer in a lot of parts, but hopefully this gives you a better understanding of everything.
Wait… Karen, one last thing — what about bputil -k? Won’t this allow users to disable SIP and allow kexts in just one launch of 1TR recoveryOS?
…
So remember what I said earlier about footguns?
bputil is such a massive footgun that Apple actively discourages you from using it to modify your BootPolicy.
(Running sudo bputil -d like mentioned above is fine, as it’s a read-only operation — it doesn’t change anything.)
This utility is not meant for normal users or even sysadmins.
It provides unabstracted access to capabilities which are normally handled for the user automatically when changing the security policy through GUIs such as the Startup Security Utility in macOS Recovery ("recoveryOS").
It is possible to make your system security much weaker and therefore easier to compromise using this tool.
This tool is not to be used in production environments.
It is possible to render your system unbootable with this tool.
It should only be used to understand how the security of Apple Silicon Macs works.
Use at your own risk!
So yes, while running bputil -k to enable kexts and then telling users to disable/weaken SIP using csrutil definitely makes the guide way easier… (and it can all be done with just one trip to recoveryOS!)
I feel like it would be extremely irresponsible of me if I encouraged users to use such a tool.
While it is true that nothing should go wrong as long as the user makes sure that they only type bputil -k, the potential for error is very large if, for instance, a typo is somehow made. (See man bputil for all the things this tool can do — it can even disable SSV!)
I’m not exaggerating when I say that bputil can definitely end up making your system unbootable, if you touch the wrong options.
Of course, if you’ve read up on the Apple documentation and you understand how the BootPolicy works and how to recover from any potential screwups, by all means, go ahead and use bputil! It’s a very useful and powerful tool, and can modify the BootPolicy in a far more granular way than any other tool.
But for everyone else, I will never encourage using this tool, nor will I ever officially put it in a tutorial.
Brilliant. To me this does make sense, possibly because I went through those steps already!
Unfortunately, including booting back into macOS once and yup, getting yelled at by some of the other system extensions I had installed. Oops!
Anyway, all it took was another reboot to get back to the right state. The bottom of my sudo bputil -d output looks exactly the same as what you’ve got above.
Oh my! This is so awesome I can’t stand it!! Working with Apple’s default Finder tab interface is painful at best. So thankful that we were able to get this done. Also glad that the alternate SIP configuration instructions were included. Thanks for that.
Terminal states, however that when you use that config, that its not supported and the machine will likely not be able to boot when those flags are removed. REALISTICALLY, how likely is that to happen? Does anyone know?
@ChrisSpera I assume you’re talking about the warning that Apple gives you in csrutil when you choose to partially enable / weaken SIP (instead of fully disabling it).
For reference for anyone else who’s reading, Apple left a message from csrutil that says this if you try to set a partially-enabled / weakened SIP state:
This is an unsupported configuration, likely to break in the future and leave your machine in an unknown state.
So, what does this actually mean?
As is becoming a… trend for my posts in this thread, it’s time for another episode of everyone’s favourite “Karen attempts to explain yet another part of Apple OS internals”!
In which I attempt to explain Apple’s XNU/Darwin CSR flags
First off, let’s take a peek into Apple’s source code for their XNU/Darwin kernel.
These are all of the CSR flags that exist as of XNU/Darwin version xnu-8019.80.24, which corresponds to macOS 12.2 Monterey (the latest available open-source release of XNU/Darwin).
What are these flags, you ask?
These are what Apple uses internally in macOS to determine which SIP features should be enabled or disabled. By default, they are all enabled.
These CSR flags are what the csrutil tool in recoveryOS is actually modifying. This has been the case ever since SIP was introduced all the way back in macOS 10.11 El Capitan (2015).
Now, do you see those weird (1 << 0), (1 << 1), (1 << 2), etc. things on the right?
If you’re totally lost as to what those numbers mean, those represent bit shift operations. (For those with programming knowledge — yes, the SIP configuration state is a bitmask.)
For the purposes of this explanation, you don’t actually need to know what bit shifts (or bitmasks) are — all you need to know is that they can be translated to a numerical / hexadecimal value.
Here, I’ll do it for you — I’ll also annotate which CSR flags translate to the various csrutil arguments, too.
As you can see, each CSR flag has its own numerical value associated with it.
For reference, TotalFinder requires these CSR flags to be disabled:
CSR_ALLOW_TASK_FOR_PID (0x04 or --without debug)
CSR_ALLOW_UNRESTRICTED_FS (0x02 or --without fs)
Apple’s scary warning when you try to leave SIP partially enabled
Basically, the reason why Apple shows you the scary warning when you try to leave SIP partially enabled (as opposed to fully disabled via csrutil disable), is because they’re basically just trying to cover for themselves, saying “I told you!” if they decide to change what some of these values mean.
They’re pretty much just saying “We reserve the right to change what any of these CSR configuration values mean in the future, and this may cause a different set of SIP features to be enabled or disabled after an update.”
… That being said, Apple has never actually done this in the 7 years since they’ve introduced these values.
I’ve personally been running a partially-enabled SIP configuration ever since macOS 10.11 El Capitan (2015), and well… the values have never changed.
Over the past 7 years, all they’ve done is add new values, not change old ones.
For instance, CSR_ALLOW_UNAUTHENTICATED_ROOT (0x800) was not a CSR flag that existed originally and is a new addition, but CSR_ALLOW_TASK_FOR_PID was always, and still is equivalent to 0x04.
But what’s important to note here is that they can, if Apple ever decides to for some reason.
Will Apple ever change the old CSR values? I don’t know. And unless you’re a time traveller from the future, no one can know.
That being said though, if they ever do decide to do so, what will probably happen is that you’ll just see some SIP features that you previously disabled end up becoming enabled again, which can be corrected by making a trip back to recoveryOS and disabling what you wanted to be disabled again via csrutil.
And even if this does somehow result in your system breaking in some way as per Apple’s warning, a trip to 1TR (hold-power-button) recoveryOS (… or if you’re using an Intel Mac, resetting your NVRAM) will fix everything.
… That was really long, can I have a tl;dr?
It’ll probably be fine. Apple has gone 7 years since macOS 10.11 El Capitan (2015) without changing anything, and I’ve been using such a partially-enabled configuration this entire time.
It was possible to enable custom sidebar icons on Big Sur with XtraFinder, it used a .plist file that pointed to the custom icons, not sure how TotalFinder does it. There’s also colorfulsidebarX from MacForge, I think it works on Monterey but it hasn’t been updated to M1 machines
@Davi The upcoming TotalFinder update will basically “just work” for the colourful sidebar feature — you won’t have to edit any plist files or anything.
Basically, whatever you see in Finder is whatever will show up in the sidebar.
Yes. That’s EXACTLY what I was referring to and thank you SO much for the awesome explanation. I truly appreciate all of your efforts and work. Please let me know how I can help. I’m a Software QA/QE VP with 30 yrs experience. Let me know what I can do.
That’s nice but… macOS always used different icons on the sidebar instead of using the folder ones. Most of the old iconsets on the internet have especially designed icons for the sidebar, so it would be great if TotalFinder used the colored ones by default and we could set our own custom icons if desired.
What I meant in my comment is that XtraFinder automatically changed the sidebar icons to the colorful version, but I could point it to any custom icon if I edited the plist file.